Automated Build Starter Kit
Keeping with the automated build topic like the last two posts, you can download an “Automated Build Starter Kit” here (click image below)

The goal of this starter kit is to enable to quickly setup an automated build for any of your .NET projects using NAnt. To get started with the kit, all you need to do is unzip the contents of the zip file and rename the folder to something like the name of the project. And that’s it you are done. You can build the sample project in the zip file by opening up the command prompt at that directory location and execute the command “go build”. The zip file also contains a sample web application and a sample web site in it. To publish the sample web application to the IIS on the current machine execute “go publishWebApp” and to publish the sample website to the IIS on the current machine execute “go publishWebSite”. To publish both the sample web application and web site, execute “go publish”. The build script automatically registers the published locations as virtual directories with IIS also. Please the ReadMe.txt file in the zip contents for more information.
Launching your automated build scripts from within Visual Studio
In my last post, I had talked about the benefits of using a common directory structure for all your projects. Well here is another good one. I used to be opening up my command prompt and changing directories to the root directory of the project to launch my build scripts every time I needed to build. Opening up the command prompt to launch the build can get old on you pretty soon. But I was able to add a couple of buttons to my Visual Studio toolbar to launch my automated build and deploy scripts eliminating the need for the command prompt. Adding commands to the Visual Studio toolbar is pretty easy and can be done as shown below. Go to the “Tools -> External Tools” item on the Visual Studio menu bar.
The batch file I use to launch my automated build is always called “Go.bat” and resides at the root of the project directory and its contents look like this
@tools\nant\NAnt.exe -buildfile:MyProject.build %*
So, I just need to launch the “Go.bat” file with the project root as the working directory with the right NAnt targets as arguments. Since, my “Go.bat” file and my Visual Studio solution file reside in the same directory (project root). I can setup my external commands as below.
Make sure to check the “Use Output Window” option so that you can watch the output from your build script in your Visual Studio output window. Cool huh…


I can setup two external tools that invoke the “Go.bat” file with the working directory set to the path where the Visual Studio solution file ($(SolutionDir)/) resides. Note that I am passing in “build” and “publish” as the arguments to the “Go.bat” file when I launch it to either run the “build” NAnt target or run the “publish” NAnt target. Once the two entries have been setup here, they will appear in the “Tools” menu options in Visual Studio.

The last thing that is left to do is the trickiest part and I am not sure why Microsoft has left it this way. Go to “Tools -> Customize” and the dialog below should pop-up. Select “Tools” in the “Categories” list on the left. And this should list the externals commands you just added on the right. But the strange part is that the externals tools you setup will not be listed with the name you set them up with but with just general names like “External Command 2” & “External Command 3” etc. The correct names will not show up until you drag the tools from the dialog and drop them into one of your Visual Studio toolbars. Weird… but it works. I had a new toolbar setup for these two buttons and dropped them on to there.

So, I am happily building and deploying my projects with a single click from within Visual Studio.

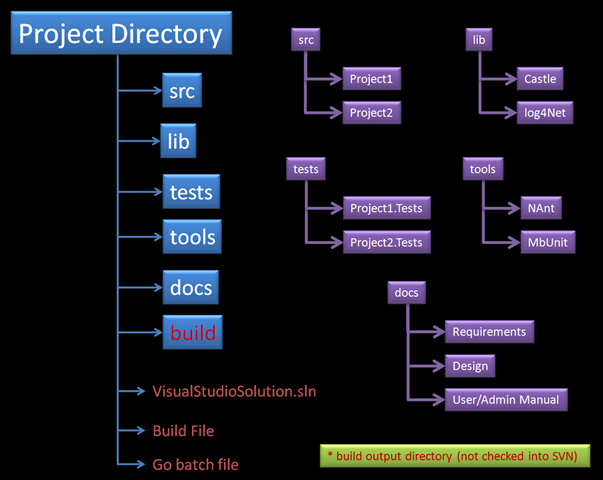
Project Directory Structure
The directory structure that is used for projects could either make your life a whole lot easier or make it a pain when you are setting up your automated builds. Apart from being a crucial part of my automated build workflow, it also helps me makes sure that I can check out the project on a new machine and have the project be build-able right away both with the build script and in Visual Studio. Here is the project directory structure that I have been using for a while now. I have been very satisfied with it. Since I use the same project structure for all my projects, I can use a template build script that I can use right away by changing a couple of values in it.
What directory structure do you use for your projects? Thoughts? Suggestions?
POCO pollution in ORMs
One of the improvements that have been made in the ORM universe is the movement towards using POCOs (Plain Old CLR Objects) instead of bloated types which pack different methods and extraneous properties that don’t really belong there. What does that really mean? Most of the ORM frameworks used to force your entity classes to inherit from a bloated base class that provided a lot of functionality that life a lot easier. So, your entity classes where not really a POCO. Entity classes that are POCOs should only contain properties and fields that they need persisted and nothing else. Using POCOs helps you achieve a clean separation of concerns that helps keep your design clean and flexible. One of the problems that you will quickly run into when using entity classes that inherit from bloated base classes is with serialization both to XML and JSON.
NHibernate is one ORM that I have used and like. The framework lets us keep the entity classes class by using POCOs and letting us store all other information like property to table column mapping etc in XML files. The framework is also committed to not polluting the POCOs. When using NHibernate, you say “Session.Save(customerEntity);” and not “customerEntity.Save();”. Meaning, the customer entity does know how to save itself but instead the database session is the one that knows how to save a customer entity. And thus the customer entity can be stored in any storage mechanism required (as XML to files etc) and not just a database.
I have been using LLBLGen (for an Oracle back-end) lately and even though it is very well designed for most use cases. But they definitely are not committed to keeping POCOs just POCOs. The definitely use heavy use of base classes. But I do have to admit that the functionality that the base classes pack with them really do save time during development for just purely database persistence.
The Enterprise Validation Application Block (VAB) also allows you to decorate your entity classes with Validation attribute decorators that really tie in domain logic into your POCOs. This validation logic can really be removed from there and provided in code but it does involve work. And as the developers, we have to make the decision as to whether that extra effort is worth it given the requirements for your projects.
Even the Entity framework team from Microsoft have realized the advantages of not polluting the POCOs. The framework started with using bloated entity classes and have slowly started their migration to using POCOs. Even thought that migration is not complete, they have made efforts towards it and have currently adopted using the Three Amigos of the non-existent IPOCO interface (which by itself defeats the cause of moving to POCOs). The framework has these interfaces in place for POCO wannabes…
So, paying more attention when selecting your ORM and to whether you are currently using pure POCOs (not pretenders) or bloated types in your application framework should help you down the lane when are trying to persist your types to someplace other than the database or trying to JSON serialize them.
ArcToSQL2008 – An ArcCatalog Command to export FeatureClasses to MS SQL SERVER 2008
I had written this tool 3-4 months ago and it had been sitting on my machine waiting to be wrapped with an installer project. I finally got around to building a setup and deployment project for it and it is ready to distribute. The tool can be downloaded below
![]()
Once installed, you should be able to open the “Tools -> Customize” dialog in ArcCatalog

Under the “GeoSpatial.NET” Categories, the “ArcToSQL2008” command should be available. Drag the command to any of the toolbars.

Select the FeatureClass you want to export to the SQL Server 2008 database and click the “ArcToSQL2008” button on the toolbar. The dialog below should pop-up. Enter the name of the SQL Server 2008 database server and click connect. The Database drop-down will get populated with all available databases on the server. Select a database from the list and enter the name of the table that you want the FeatureClass exported to. Click OK. The FeatureClass will get exported and a message box should pop-up when the import is completed.

Some highlights of the tool:
-
Exports FeatureClasses in a Projected Co-ordinate System as SQLGeometry in SQL 2008.
-
Exports FeatureClasses in a Geographic Co-ordinate System as SQLGeography in SQL 2008.
-
Any errors that occur during the export are logged in a log file found under in the install directory.
-
The tool is built using a broader GIS framework that should enable developers to customize the export process to their liking. I still have a little bit of house cleaning on the code for the broader GIS framework. I will post when it is all done. Hopefully that will be real soon. Contact me if you want to look at it sooner…
Things left to do:
-
Better UI showing the progress of the export operation.
-
More flexibility to the export operation by allowing the user to select the fields to be exported.
-
The export operation can be made faster by using the geometry builder classes to construct the SQLGeometry and SQLGeography objects. I took the shortcut for now and just parsed out the geometries from WKT strings.
Please let me know if you find any bugs in the tool using the “contact me” link on the right pane of this blog.
Options for implementing Spatial Validation rules
I had a pretty engaging dialog with one of my colleagues today about how and where to implement spatial validation rules for one of the enterprise GIS web application that we are working on. I thought I would discuss some of those options here to possibly invite more suggestions or criticisms of some of the approaches
Implement and resolve the spatial validations on the client-side web interface only. Since this application is the only one updating the SDE, lets not spend a lot of effort performing spatial validations on the server-side also. Well, to put it in simpler terms, if the user is sketching a “Land Owner Boundary” that crosses state boundaries, then use the AGS REST API to make sure that the sketched shape does not cross state boundaries and if it does use a custom REST service to clip to the required boundaries. So, the spatial validation and the resolution is performed by the client before the shape is sent back to the server to be added as a new feature. But not performing all the validations on the server also just doesn’t feel right.
Perform all the spatial validation involved on the ArcGIS Server machine in Feature Class Extensions by implementing the various interfaces exposed in the ArcObjects SDK. This way all the data getting into the SDE has been passed through the same pipeline of validation methods before being inserted/updated into the SDE. If you are interested in going this route, check out the following interfaces that are available and will help get the job done. IClassExtension, IObjectClassExtension, IObjectClassEvents, IObjectClassValidation, IFeatureClassExtension. This method seems like a very good way too do things but there are some drawbacks to it. The first of which is implementing validations can get a little hairy fast and all the validation logic needs to be written in ArcObjects which is not a fast way of doing things. It would be easier, fast and more robust to construct Geo-processing models to perform these spatial validations. The bigger one I think is that when handling the OnCreate event or implementing the ValidateRow method, there is no way for us to pass in more context information into these methods which are necessary to perform the spatial validations required.
I personally think that the decision to put the validations in these feature class extensions as mentioned above is more similar to the argument of putting domain logic in Stored Procedures and Triggers in relational databases. It is very powerful, but also very constraining and rigid. Also, not all validations can be implemented this way.
Perform the spatial validation in the Domain Object model sitting on the web server( or ArcGIS server) machine. In our web application, we have a data access layer that performs the CRUD operations on an Oracle DB and the SDE. We also have the domain objects that models the entities in our domain/project and in turn use the data access layer to perform the operations required. This is a very flexible place to position the spatial validation logic since in this layer of the application, we have access to not only the entire domain object of the feature(all feature attributes) and other involved domain objects (related features etc) instead of just the data access objects which by themselves(individually) don’t tell us everything about that feature. This methods also lends itself better to unit testing than the previous two methods.
I am personally leaning towards the third option of having the spatial validations performed in the domain objects. Well, that is not to say that the spatial validation/resolutions need not be done on the client-side. I don’t think there is no escaping that nor should we attempt to. In the past, for Windows Forms based database applications, we could have represented all the validation logic in one place (on our POCO’s for example) using some library like the Validation Application Block in the Enterprise Library. This validation logic can be used on the UI (windows forms using IDataErrorInfo) and also on the server-side validations. But since we are swimming in the world wide web, the same validation logic needs to be represented in JavaScript using something like the jQuery Validation plug-in rules for example. Now, stack on top of that spatial validation, and it gets even better…<grin>
Automating Start/Stop AGS and AGS services
I was working on setting up our automated build process for one of the projects I am working on and needed a way to start/stop the ArcGIS server running on a remote machine and also start/stop specific ArcGIS services running on remote machines. I was looking to see if ArcGIS Server provided any command line tools to perform these tasks so that I can just call these commands from my build file. But there is no out-of-the-box command line tools that come with ArcGIS Server which I could use for that purpose. So, I had to improvise and use some utilities and cook up a little bit of code.
To start/stop ArcGIS Services running on a remote machine, I was able to use the “PsService” from the Sysnternals Process utilities. Here is the crux of what PsService does.
PsService displays the status, configuration, and dependencies of a service, and allows you to start, stop, pause, resume and restart them. Unlike the SC utility, PsService enables you to logon to a remote system using a different account, for cases when the account from which you run it doesn’t have required permissions on the remote system
Usage: psservice [\\computer [-u username] [-p password]] <command> <options>
So, we can use the “stop” command and provide the service name for ArcGIS Server process “ArcServerObjectManager” as the option. Here is an example showing how it can be used.
psservice \\MachineName -u username -p password stop ArcServerObjectManager
Since, I had to call it from my NAnt build file, here is a sample of how it can be done
Setting up NAnt build file properties
<property name =“AGSMachineName” value=“myMachine”/>
<property name =“AGSAdminUser” value=“myUserName”/>
<property name =“AGSAdminPassword” value=“myPassword”/>
<!–comma seperated list of MapServices that needs to started/stopped–>
<property name =“AGSMapServices” value=“BaseMap, Boundaries, DynamicMap”/>
Targets to Start and Stop ArcGIS Server
<target name =“StopAGS”>
<exec program=“psservice” basedir=“.\tools\pstools\” append=“true”>
<arg line=“\\${AGSMachineName} -u ${AGSAdminUser} -p ${AGSAdminPassword} stop ArcServerObjectManager”/>
</exec>
</target>
<target name =“StartAGS”>
<exec program=“psservice” basedir=“.\tools\pstools\” append=“true”>
<arg line=“\\${AGSMachineName} -u ${AGSAdminUser} -p ${AGSAdminPassword} start ArcServerObjectManager”/>
</exec>
</target>
Now that’s good. The first hurdle has been crossed. But I still needed to start and stop specific MapServices that I desired. I couldn’t shortcut my way through this one and had to write some code to do this. The code to do it was pretty simple and didn’t turn out to be a pain.
The tool to start/stop ArcGIS services can be downloaded here
The source code for this tool can be downloaded here
The syntax to use the tool from the command line is
Usage: arcgisservice [serverName] [serviceName] [serviceType] [start | stop | restart] <username> <password>
The “username” & “password” for a user belonging to the “agsadmin” group can be specified here. If they are not specified, your current windows credentials will be used. And here is how it can be used in the NAnt build file.
Targets to Start and Stop ArcGIS MapServices specified as a comma seperated list
<target name=“StopMaps”>
<foreach item=“String” in=“${AGSMapServices}” delim=“,” property=“mapService”>
<exec program=“agsUtil” basedir=“.\tools\AGSTools\” append=“true”>
<arg line=” ${AGSMachineName} ${mapService} MapServer stop ${AGSAdminUser} ${AGSAdminPassword}”/>
</exec>
</foreach>
</target>
<target name=“StartMaps”>
<foreach item=“String” in=“${AGSMapServices}” delim=“,” property=“mapService”>
<exec program=“agsUtil” basedir=“.\tools\AGSTools\” append=“true”>
<arg line=“${AGSMachineName} ${mapService} MapServer start ${AGSAdminUser} ${AGSAdminPassword}”/>
</exec>
</foreach>
</target>
The target above will loop through and stop/start all the MapServices specified as a comma separated list in the “AGSMapServices” NAnt property.
And if you want to do the above and much more through another GUI didn’t want ArcCatalog installed all over the place, then the SOEXplorer would be the way to go.
 Subscribe
 Follow Me
 Contact me
1 comment